
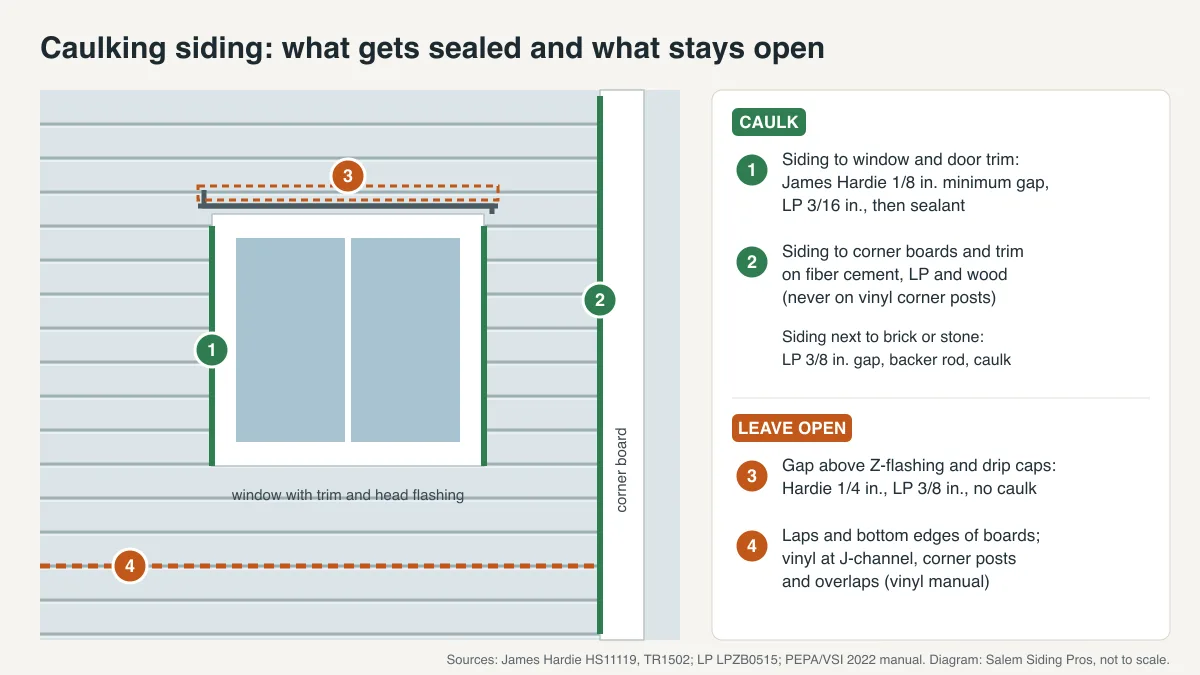
Yes, but only in certain places. Caulk the joints where siding meets window and door trim, corner boards and masonry, leaving the gap the siding maker specifies. Leave open the laps between courses, the gap above Z-flashing and drip caps, and vinyl panels at their channels and corner posts. Those openings let water drain out of the wall.
The rest of this guide goes material by material through what the vinyl siding manual and the James Hardie, LP SmartSide and Western Red Cedar instructions say about caulk. It covers which caulk they name, when Salem’s weather allows the work, what changes on a house built before 1978, and when a failed caulk joint is a sign of something bigger.
In short:
- Caulk seals the joint between the siding and something else: trim, a corner board, brick. It is not flashing, and Oregon’s code requires flashing at windows, doors, trim and roof lines whatever the caulk.
- Leave open anything built to drain: lap edges, the 1/4-inch or 3/8-inch gap above flashing, and the vinyl joints the manual says to leave alone.
- Use the sealant the siding maker names. For James Hardie and LP that means a paintable ASTM C920 sealant rated Class 25 or higher (James Hardie also accepts an ASTM C834 latex sealant).
- Old caulk that has cracked is routine upkeep. Caulk that keeps failing over soft or swollen wood is a symptom, and fresh caulk over it traps water.
Caulk is the last line of defense, not the first
A siding wall keeps water out in layers. The siding sheds most of it. Behind the siding, Oregon’s residential code requires a water-resistive barrier over every wall, and section R703.4 requires corrosion-resistant flashing “applied shingle-fashion” at window and door openings, continuously above projecting wood trim, where decks attach, and at roof-to-wall intersections, with a kick-out flashing at each one. House wrap and rainscreen rules in Oregon covers those layers in detail.
Caulk sits on the outside of all that. It closes the joint between two materials so less water reaches the layers behind, and as the most exposed part of the wall it is the part that needs renewing. The Western Red Cedar Lumber Association’s installation guidance puts it plainly: caulking is not a permanent solution and needs regular maintenance, it should not be relied on as the only barrier to moisture, and “caulking in lieu of flashing is not acceptable.” LP’s lap siding instructions likewise require every opening to be “properly sealed or flashed” so moisture cannot get in or build up.
So the useful question is not whether the house needs more caulk. It is whether each joint is one the siding maker wants sealed, or one built to drain.
Which code applies. Section numbers are from the 2023 Oregon Residential Specialty Code. Oregon’s Building Codes Division made the 2026 edition’s administrative chapter mandatory on October 1, 2026, and allows either edition for construction until April 1, 2027; the integrated 2026 codebook was still being published when this was checked on October 29, 2026.
Where to caulk siding
The joints the siding makers ask you to seal are the ones where siding stops against a different material:
| Joint | What the instructions say |
|---|---|
| Siding to window and door trim | James Hardie’s HZ10 trim instructions: leave at least a 1/8-inch gap between siding and trim, then caulk. LP: leave 3/16 inch where siding butts window trim and door casings, and seal. |
| Siding to corner boards and other vertical trim | Same gaps as above on fiber cement and LP. The cedar association lists corners among the exterior joints to caulk. |
| Siding next to brick, stone or stucco | LP: leave a 3/8-inch gap and caulk, with backer rod if the caulk maker requires it. |
| Butt joints between boards | Allowed but not the only option on fiber cement and LP (see the material sections below). |
| Field-cut ends and edges | James Hardie: caulk, paint or prime every field cut. LP: seal all exposed cuts with paint or sealant. |
| Holes and overdriven nails | LP: a nail set deeper than 1/8 inch gets caulked and re-nailed. |
| Around window and door frames, on a re-side | The vinyl manual: scrape off loose caulk and re-caulk around windows, doors and other areas before re-siding. |
Caulking between the window frame itself and its trim is a separate joint. James Hardie’s trim instructions say to follow the window or door maker’s instructions there, so the answer depends on the window.
Where not to caulk siding
Some gaps on a siding wall look unfinished but are there on purpose. Sealing them closes the path water uses to get back out.
- The gap above Z-flashing and drip caps. James Hardie’s HardiePlank and trim instructions show at least 1/4 inch between the flashing and the siding above it, marked “Do not caulk.” LP asks for 3/8 inch above any drip cap flashing and says the same. Water running down the flashing has to be able to leave at that gap.
- The top edge of window and door head trim. James Hardie’s trim drawing for openings says “do not caulk along top edge,” where the head flashing laps over the trim.
- The laps between courses. The overlap where a board sits on the board below is the wall’s drainage edge. The vinyl manual says not to caulk the overlap joints, and the cedar association says not to caulk areas that stop moisture escaping the wall cavity.
- Under windows and where flashing meets trim, on cedar. The cedar association names both as places not to caulk, for the same reason.
- Vinyl panels at their channels and corner posts. Covered in the vinyl section below.
A useful test: if water that got behind the siding would naturally run out through the gap, leave it open. If the gap is a vertical joint where siding stops against trim, it is probably meant to be sealed.
Caulking vinyl siding
Vinyl is the material where caulk does the most harm. The Polymeric Exterior Products Association’s installation manual, the reference behind the Vinyl Siding Institute’s program, lists among its basic rules: “Do not caulk the panels where they meet the receiver of inside corners, outside corners, or J-trim,” and “Do not caulk the overlap joints.”
The reason is movement. Vinyl expands and contracts with temperature, so the manual’s horizontal siding section has installers leave a 1/4-inch gap between the siding and all corner posts and channels, increased to 3/8 inch when installing below 40°F, and leave about 1/32 inch, the thickness of a dime, between each nail head and the panel. A panel caulked into its channel has nowhere to go when it warms up, which is one cause of the ripples and buckles covered on the vinyl siding page.
Sealant still has a place on a vinyl job, behind the siding. The manual’s window preparation steps bed the window’s nailing flanges in a continuous bead of sealant before the jamb and head flashing go on, call for sealant compatible with the window, flashing and barrier materials, and seal an existing exterior casing to the sheathing or barrier. Where siding meets a brick sill, the manual has the sheathing and the field-formed head flashing caulked to the brick. On a re-side, it says to scrape off loose caulk and re-caulk around windows, doors and other areas first.
So on an existing vinyl house, a homeowner’s caulk gun belongs on the window and door frames and on penetrations the manual tells you to seal, not on the siding itself.
Caulking Hardie and other fiber cement siding
James Hardie publishes separate instructions by climate zone, and its zone lookup puts Salem in HZ10, as the fiber cement siding page explains. Its HardiePlank HZ10 instructions (effective December 2019) and Hardie Trim HZ10 instructions (effective September 2025) set out the caulk rules:
- Butt joints. Boards meet “in moderate contact,” and the joint gets one of three treatments: joint flashing behind it, which James Hardie recommends; caulking; or an H-jointer cover. These are the same three options section R703.10.2 of Oregon’s code lists for fiber cement lap ends.
- ColorPlus siding. Caulk is not recommended at the joints of James Hardie’s factory-finished ColorPlus boards, because the caulk and the finish weather differently, and nail heads on ColorPlus are not caulked; they are touched up with James Hardie’s own applicator. Field-cut ColorPlus edges are run into trim where possible and caulked with color-matched caulk.
- Trim joints. At least 1/8 inch between siding and trim, then caulk.
- Flashing. At least 1/4 inch above Z-flashing, not caulked.
- Cut edges. Every field-cut edge is caulked, painted or primed.
- Which caulk. “For best results use an Elastomeric Joint Sealant complying with ASTM C920 Grade NS, Class 25 or higher or a Latex Joint Sealant complying with ASTM C834,” applied to the caulk maker’s instructions. James Hardie notes that some caulks do not allow tooling, and that painting over caulk on primed boards can leave a sheen difference.
James Hardie also warns that installing wet boards can cause shrinkage at butt joints. A butt joint that has opened into a visible gap on a newer fiber cement wall is worth asking about rather than just filling.
Caulking LP SmartSide siding
LP’s SmartSide lap siding instructions (LPZB0515, dated December 8, 2023) are the most specific of the four about gaps:
- Trim and casings: a 3/16-inch gap where siding butts window trim, door casings and other trim, then seal.
- Butt joints: four options. Caulk the 3/16-inch gap; use a joint moulding that keeps a net 3/16 inch for expansion; or, as separate options for primed and for prefinished siding, leave the joint open over pan flashing at least 4 inches wide with the factory ends kept intact (primed ends get an extra coat of acrylic primer first).
- Masonry: where siding or trim meets stucco, brick, cultured stone or mortar, a 3/8-inch gap, caulked, with backer rod if the caulk maker requires it.
- Flashing: a 3/8-inch gap above any drip cap flashing, and “do not caulk gap.”
- Cut edges: every exposed cut sealed with paint or sealant.
- Which caulk: “a high-quality, non-hardening, paintable sealant meeting ASTM C920, minimum Class 25,” applied to the sealant maker’s instructions.
LP also states that warranty remedies are not available if its instructions are not followed, which is a practical reason to match the caulk to the specification rather than to whatever is on the shelf. The same document says all wood substrate exposed to the weather must be sealed to prevent moisture intrusion and water buildup, which is why the cut edges and joints get attention.
Caulking cedar and other wood siding
The Western Red Cedar Lumber Association’s guidance treats caulk as maintenance, not a seal for life. It recommends high-performance acrylic-latex, acrylic, acrylic-silicone, polyurethane, polysulfide or terpolymer rubber caulks to seal gaps around windows, doors, corners and other exterior joints exposed to water. It says pure silicone and clear caulks “do not work well” on western red cedar and are not recommended.
Its limits are the same ones that apply to every material: do not caulk where it stops moisture leaving the wall, such as under windows and around flashing, do not caulk where flashing meets trim, and keep siding and trim about 1/4 inch above a flashing ledge. For butt joints in the field, it describes cutting the board ends at 45 degrees so they overlap.
The association also warns that caulking that is not inspected and maintained may fail and trap water, creating severe moisture problems. On wood, that is how a failed joint turns into rot. The cedar and wood siding page covers repairing boards and shingles once that has happened.
Choosing caulk for siding
The siding makers’ specifications come down to three things to check on the label:
- The standard. James Hardie and LP both name ASTM C920, Class 25 or higher; James Hardie also accepts ASTM C834 latex sealant. The class number is movement: an industry course on exterior sealants, sponsored by the sealant maker OSI, explains that a Class 25 sealant can handle contraction or expansion of up to 25 percent of the original joint width.
- Paintable. LP requires it, and primed boards from both makers have to be painted. The same course notes that silicones cannot be painted.
- The temperature and cure limits. The caulk maker’s label or data sheet gives the temperatures it can be applied in and how long it needs before rain or paint. James Hardie and LP both say to apply sealant to the sealant maker’s instructions.
A bead also needs a sound joint to stick to. The course notes that most sealants need a completely dry surface for good adhesion. Old, loose caulk comes out first; the vinyl manual says to scrape it off before re-caulking.
When to caulk siding in Salem
Salem’s weather sets the calendar more than any product does. NOAA’s 1991-2020 normals for Salem’s McNary Field station show how quickly the dry season closes:
| Month | Average days with measurable rain | Average low |
|---|---|---|
| July | 2.3 | 55.1°F |
| August | 3.2 | 54.8°F |
| September | 6.4 | 50.6°F |
| October | 12.5 | 43.9°F |
| November | 17.7 | 39.0°F |
| December | 18.9 | 35.1°F |
Measurable rain means at least 0.01 inch that day. From November through March the station averages more than 15 days a month of it, and December and January each average 11 to 12 nights below freezing.
What that means in practice:
- July through September is the easiest window: dry joints, warm surfaces, and time for a bead to cure before the next rain.
- October still has workable dry spells, but plan around the forecast and the cartridge’s cure time, and make sure the joint has dried out, not just the face of the siding.
- November through March is for small, urgent fixes during a dry stretch, using a sealant rated for the conditions, not for re-caulking a whole house. If a joint is letting water in now, a temporary fix and a proper job in summer is a reasonable plan.
For vinyl, cold weather also changes the installation itself: the manual’s 3/8-inch gap below 40°F applies to hanging panels, which is one more reason siding work in Salem bunches into the dry months.
Old caulk on older Salem houses
On a house built before 1978, the paint next to old caulk may contain lead. Under the federal Renovation, Repair and Painting rule, contractor work that disturbs more than 20 square feet of exterior paint on pre-1978 housing has to follow lead-safe practices, and window replacement is covered regardless of size. In Oregon the rule is run by the Construction Contractors Board and the Oregon Health Authority: a licensed contractor doing this work needs a Lead-Based Paint Renovation license from the CCB. The rule does not apply to people working on their own home, though the same care is sensible.
Scraping out a few feet of caulk at one window is usually under the 20-square-foot line. Stripping and re-caulking every joint on a painted wood house, with scraping and repainting, may not be, so ask how the work will be done and whether lead-safe practices are included.

When failed caulk means a bigger problem
Caulk that has cracked, pulled away or gone chalky after several summers is normal wear. Cut it out, clean the joint and re-caulk. Some failures point somewhere else:
- The wood next to the joint is soft. Press it with a screwdriver. If it gives, water has likely been getting in for a while, and the board, trim or sill needs repair before any caulk goes on. What causes dry rot explains how far it can spread, and dry rot repair in Salem covers the fix.
- The siding edges are swollen. Puffy, soft board edges on 1980s and 1990s lap siding often mean hardboard or older OSB siding, which caulk cannot save. See swelling hardboard siding.
- The same joint fails every year. A joint that keeps opening may be moving more than the caulk can stretch, or water may be reaching it from above: a missing kick-out flashing, an overflowing gutter, or head flashing that was never installed.
- There is staining or peeling below a window or roof corner. That points to water behind the siding, and fresh caulk on the outside will not reach it. The siding repair page covers flashing and board repairs.
Caulking is upkeep and stays in the siding layer. Once a repair reaches the sheathing behind the siding, Salem wants a building permit; the siding permit guide explains where the city draws that line.
Getting siding joints looked at
If the house needs a few joints re-caulked, that is upkeep an owner can often handle with the right sealant and a dry week. If soft wood, swelling or leaks turn up along the way, it becomes a siding repair: the damaged boards or trim replaced, the flashing fixed, and the joints sealed to the maker’s instructions.
Describe your project on the request page: which walls, what the siding is, what you found when you probed the wood, and the year the house was built. Whoever you end up hiring, check their license on the CCB license search before you sign anything.
This page is general information, not professional advice about your specific situation. Have it assessed by a qualified professional before making decisions. Last reviewed October 29, 2026.